Wsl2
This article goes over WSL 1 and 2 for Feature Update 2004. This will help you know which WSL you are currently using for any Linux installs on your PC.
Source Article: https://docs.microsoft.com/en-us/windows/wsl/install-win10 I copy these because Microsoft is notorious for changing URLs and to make additions
Install the Windows Subsystem for Linux
Before installing any Linux distributions on Windows, you must enable the “Windows Subsystem for Linux” optional feature.
Open PowerShell as Administrator and run:
dism.exe /online /enable-feature /featurename:Microsoft-Windows-Subsystem-Linux /all /norestart
To only install WSL 1, you should now restart your machine and move on to Install your Linux distribution of choice, otherwise wait to restart and move on to update to WSL 2. Read more about Comparing WSL 2 and WSL 1.
Update to WSL 2
To update to WSL 2, you must meet the follow criteria:
- Running Windows 10, updated to version 2004, Build 19041 or higher.
- Check your Windows version by selecting the Windows logo key + R, type
winver, select OK. (Or enter the ver command in Windows Command Prompt). Please update to the latest Windows version if your build is lower than 19041. Get Windows Update Assistant. - Enable the ‘Virtual Machine Platform’ optional component
Before installing WSL 2, you must enable the “Virtual Machine Platform” optional feature.
Open PowerShell as Administrator and run:
dism.exe /online /enable-feature /featurename:VirtualMachinePlatform /all /norestart
Restart your machine to complete the WSL install and update to WSL 2.
Set WSL 2 as your default version
Run the following command in Powershell to set WSL 2 as the default version when installing a new Linux distribution:
wsl --set-default-version 2
Note: The update from WSL 1 to WSL 2 may take several minutes to complete depending on the size of your targeted distribution.
Troubleshooting WSL 2 set-default error

If you can’t set the default version after enabling the virtual machine platform and linux subsystem for windows. Then you need to do a kernel upgrade. This done by running the following msi file: https://wslstorestorage.blob.core.windows.net/wslblob/wsl_update_x64.msi
Install your Linux distribution of choice
Open the Microsoft Store and select your favorite Linux distribution.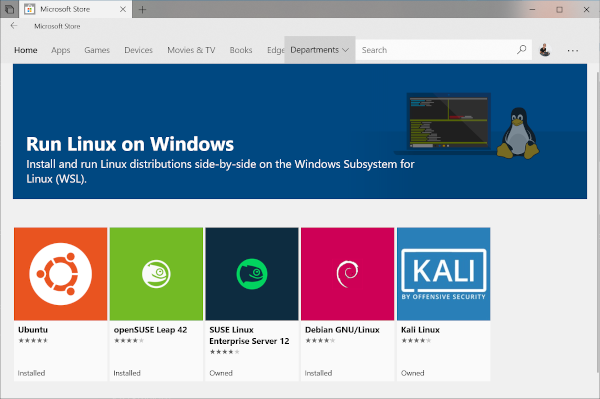
The following links will open the Microsoft store page for each distribution:
- Ubuntu 16.04 LTS
- Ubuntu 18.04 LTS
- Ubuntu 20.04 LTS
- openSUSE Leap 15.1
- SUSE Linux Enterprise Server 12 SP5
- SUSE Linux Enterprise Server 15 SP1
- Kali Linux
- Debian GNU/Linux
- Fedora Remix for WSL
- Pengwin
- Pengwin Enterprise
- Alpine WSL
From the distribution’s page, select “Get”.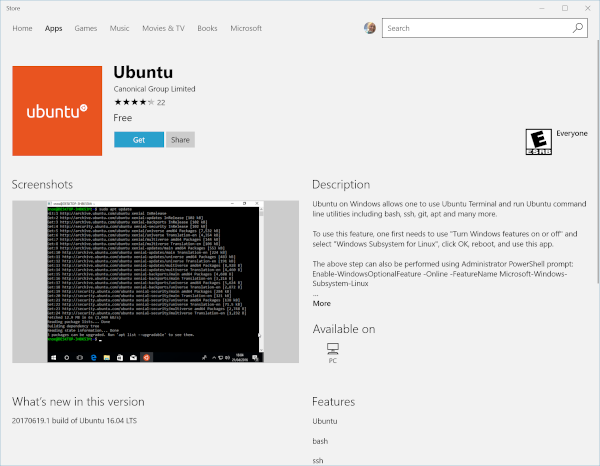
Set up a new distribution
The first time you launch a newly installed Linux distribution, a console window will open and you’ll be asked to wait for a minute or two for files to de-compress and be stored on your PC. All future launches should take less than a second.
You will then need to create a user account and password for your new Linux distribution.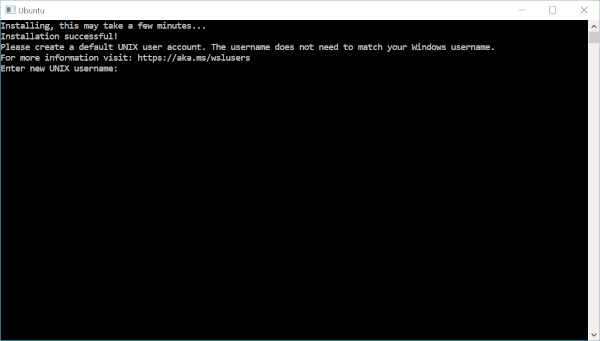
Set your distribution version to WSL 1 or WSL 2
You can check the WSL version assigned to each of the Linux distributions you have installed by opening the PowerShell command line and entering the command (only available in Windows Build 19041 or higher): wsl -l -v
wsl --list --verbose
To set a distribution to be backed by either version of WSL please run:
wsl --set-version <distribution name> <versionNumber>
Make sure to replace
Additionally, if you want to make WSL 2 your default architecture you can do so with this command:
wsl --set-default-version 2
Note: This will set the version of any new distribution installed to WSL 2.
Troubleshooting installation
Below are related errors and suggested fixes. Refer to the WSL troubleshooting page for other common errors and their solutions.
Installation failed with error 0x80070003
The Windows Subsystem for Linux only runs on your system drive (usually this is your C: drive). Make sure that distributions are stored on your system drive:
Open Settings -> Storage -> More Storage Settings: Change where new content is saved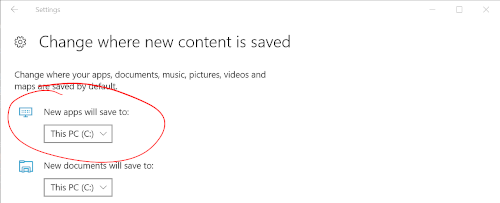
WslRegisterDistribution failed with error 0x8007019e
The Windows Subsystem for Linux optional component is not enabled:
Open Control Panel -> Programs and Features -> Turn Windows Feature on or off -> Check Windows Subsystem for Linux or using the PowerShell cmdlet mentioned at the beginning of this article.
Installation failed with error 0x80070003 or error 0x80370102
Please make sure that virtualization is enabled inside of your computer’s BIOS. The instructions on how to do this will vary from computer to computer, and will most likely be under CPU related options.
Error when trying to upgrade: Invalid command line option: wsl –set-version Ubuntu 2
Please make sure that you have the Windows Subsystem for Linux enabled, and that you’re using Windows Build version 19041 or higher. To enable WSL run this command in a Powershell prompt with admin privileges: Enable-WindowsOptionalFeature -Online -FeatureName Microsoft-Windows-Subsystem-Linux. You can find the full WSL install instructions here.
The requested operation could not be completed due to a virtual disk system limitation. Virtual hard disk files must be uncompressed and unencrypted and must not be sparse.
Please check WSL Github thread #4103 where this issue is being tracked for updated information.
The term ‘wsl’ is not recognized as the name of a cmdlet, function, script file, or operable program.
Ensure that the Windows Subsystem for Linux Optional Component is installed. Additionally, if you are using an Arm64 device and running this command from PowerShell, you will receive this error. Instead run wsl.exe from PowerShell Core, or Command Prompt.
Conclusion
WSL 2 is still very new and as such is still rough around the edges. However, the performance increase is undeniable and is a substantial improvement over