How to Secure A Web Server

In this article, I show you all the steps needed to secure a web server and improve your security. I recommend doing all of these things on every installation. Also, just because you secure your server doesn’t mean you can neglect it. I highly recommend monitoring it and adjusting security as needed. Monitoring is required for proper security in my opinion.
Secure A Web Server Steps

Install UFW
sudo apt-get update
sudo apt-get install ufw
sudo ufw limit 22/tcp
sudo ufw allow 80/tcp
sudo ufw allow 443/tcp
sudo ufw enable
Verifysudo ufw status
Do Global blocks
sudo ufw default deny incoming
sudo ufw default allow outgoing

Change SSH to Key
Remote Machine: ssh-keygen -t rsa
Transfer to Server
Method 1:
Transfer pub ssh key to server
scp ~/.ssh/id_rsa.pub [email protected]:~
cat ~/id_rsa.pub >> ~/.ssh/authorized_keys
Method 2:
Copy key and place in authorized_key file in one commandssh-copy-id -i ~/.ssh/id_rsa.pub [email protected]
Secure a Web Server Disabling Password Auth through SSH
Change the following lines in /etc/sshd_config
ChallengeResponseAuthentication no
PasswordAuthentication no
UsePAM no
PermitRootLogin no
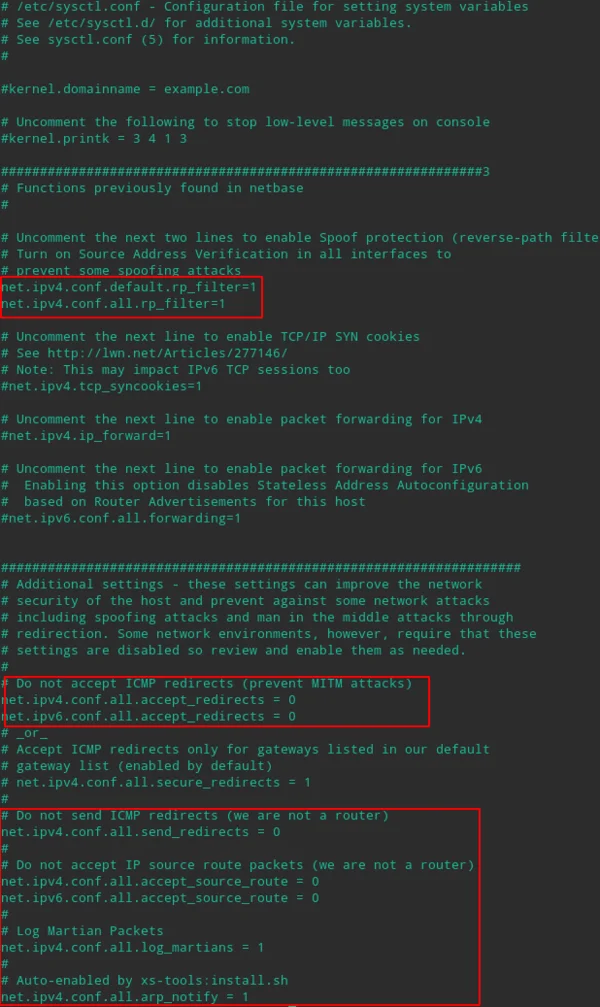
Edit /etc/sysctl.conf
Enable security features
Prevent IP Spoof /etc/host.conf
Change File to mirror below:
order bind,hosts
multi on
nospoof on
Install Fail2Ban
sudo apt install fail2ban
sudo systemctl enable fail2ban
sudo systemctl start fail2ban
Check Listening Ports
netstat -tunlp
You will now have completed the basics of a secure web server!